What is long exposure photography? How do you use it? What are some tips, tricks, and lessons learned that can help you get started?
I'll answer those questions (and more) in just a moment. But first, remember Chef Gusteau from the Pixar hit movie Ratatouille? He's the portly chef who guides Remy with the foundational belief that “anyone can cook”. But what does that have to do with long exposure photography?

Chef Gusteau from Ratatouille. Image by LordAlphie
A fine meal can be appreciated by just about anyone. But cooking it requires some knowledge of the core ingredients involved and how (and when) to mix them. The same can be said of photography. And long exposure (LE) photography is one of those special meals that many of us love to enjoy. We don't always know how it's prepared, but damn if it doesn't satisfy our palate when cooked just right.
The good news is that working with long exposures doesn't require a lot of exotic ingredients. But there is one specific ingredient that you have to consider differently in LE photography. Experimenting with (and eventually mastering) that single ingredient will have you believing, just like Gusteau, that anyone can cook up a long exposure photo.
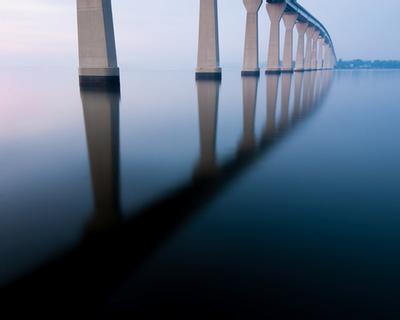
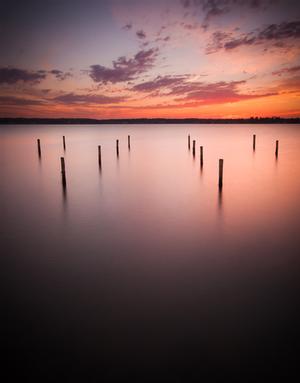
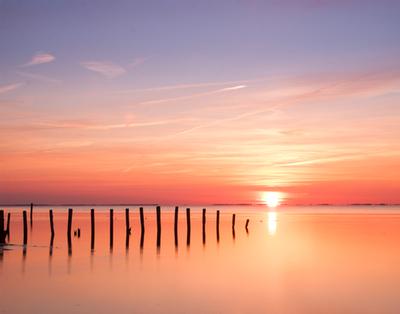
An early morning long exposure, in Solomons, Maryland
Before we get to the magical ingredient, let's define what it is we're talking about.
Long Exposure photographs use a subjectively longer
shutter speed which results in scenes that look
different than when viewed with the naked eye.
Very short shutter speeds freeze action and motion, sometimes in a way that allows us to see what we couldn't (like the split second someone hits the surface of the water in a pool). Long shutter speeds have the same effect; they turn the motion of the world around us into something we couldn't see on our own, they just do it on a different scale. And that's the magical ingredient.
Motion
Capturing light is the first thing photography does, for without light there is nothing to see. But think of motion as a very close second when it comes to LE. The goal is to take the movement of the world and use it to paint a still image. Motion is your paintbrush. Capturing the motion of the light or of the subjects itself is what you have to aim for.
49 seconds in Solomons, Maryland
Why use this technique?
- Bring the motion of a scene to life, making it feel like it is still moving. This is useful for things like getting motion blur in vehicles, joggers, bikes, etc.
- Transform the motion into something new and unique, like abstracts or capturing the motion of amusement rides at a carnival.
- Use the motion to erase elements from a photograph, like people walking through a room.
- Use the motion to hide details from a scene. For example, long exposures of water will hide ripples and patterns and smooth the surfaces.
Using LE does not instantly transform all your photos into interesting or stunning shots. You still have to pay attention to the basics (like composition, color, etc). What LE does do is provide another tool in the toolbox that, when used appropriately, can definitely open up a world of creativity.
Let's open up the kitchen and get cooking.
Recommended Equipment
Your camera should have the following features:
- Long shutter speeds (10, 15, 30 seconds or longer). All DSLR models have this, some point-and-shoot models support this. If your camera has a bulb mode, that's best. Shutter speeds in these ranges allow you to completely blur people, water (ocean, rivers, lakes), and even capture the movement of the clouds
- Manual exposure settings (explained later)
- Very high ISO values can be helpful but it isn't absolutely required (again, explained later)
Extras that are needed include:
How do you get started?
Learn by example and learn by experimenting. LE photography isn't rocket science. The basic mechanics are as follows:
- Setup your camera on a tripod and compose the scene as desired
- Determine the proper shutter speed (or choose a long shutter to just experiment)
- Adjust the remaining settings like ISO and aperture to achieve the desired exposure
- Use a shutter release to trigger the shot. TIP: if you aren't using bulb mode, you can get away without a shutter release by using the timer on your camera. That way any camera shake caused by your hand can be safely eliminated before the shutter opens.
- Check the results (yes, chimping is usually needed when doing LE), adjust the settings if needed, and shoot again
The very first thing that dictates how you might capture a LE photo is the available light, so the time of day you want to shoot can change things a lot. Capturing a shot in the middle of the night is totally different from capturing it during the day. Here are some examples to demonstrate different environments at different times of day. The length of the exposure is listed below each shot.
Night & Full Moon
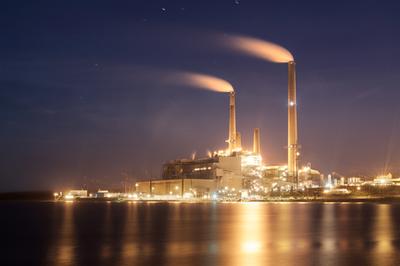
65 seconds at Mt. Storm Power Plant
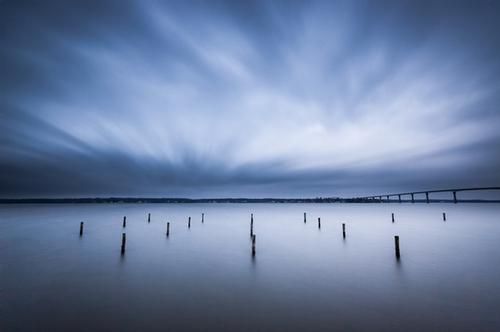
143 seconds on Chesapeake Bay
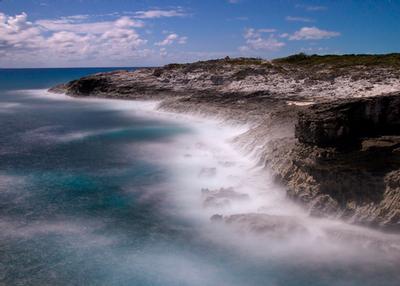
203 seconds, Staniel Cay, Bahamas
Sunrise & Sunset
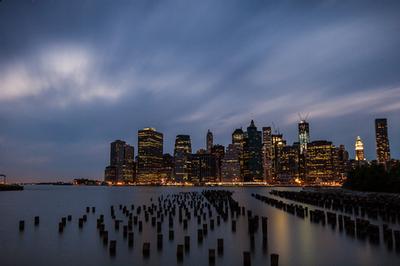
179 seconds in Brooklyn
30 seconds in Solomons, Maryland
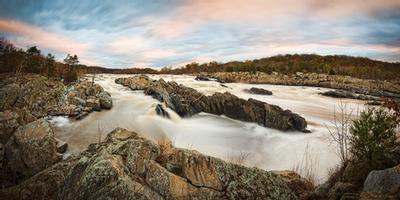
15 seconds at Great Falls, Virginia
7 seconds in North Beach, Maryland
Daytime

30 seconds in Northern Virginia

15 seconds, Rose River Falls, Shenandoah
What to look for
Like any photograph, the subject matters. Just because it was taken with a long exposure doesn't make it interesting. Remember, LE changes the way motion and movement is perceived in the photo. Too much motion, and the shot becomes unrecognizable. This can be useful if you're going for an abstract kind of shot. On the other extreme, little or no motion and the LE technique isn't useful. Last time I checked, flowers aren't dancing around so a still life photo of a vase of flowers doesn't matter if the shot is 1/500 second or 5 seconds. You need some movement...some interesting movement in the shot.
Subjects to look for include:
- Crowds of tightly packed people in their environment (like crowds exiting a sporting venue)
- Vehicles or other things normally associated with movement
- Waterfalls (probably the most common LE shot)
- Water and beach scenes, especially with immovable objects like piers, docks, rocks, etc
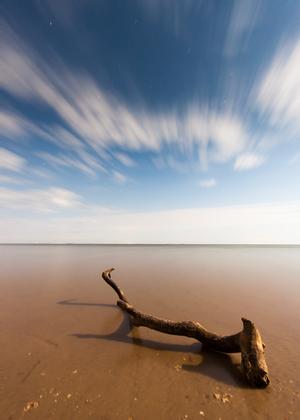
- High contrast or distinct clouds over a landscape. If the clouds aren't high contrast or very distinct (like small clouds where there's still a lot of clear sky) then a LE shot will tend to blend them together and the cloud definitions will become lost in a sea of gray
What all these subjects typically have in common is they include a combination of movement and still elements. The solid, unmoving parts of the shot provide grounding for the viewer, while the moving parts change and become something else. This is why waterfalls arguably provide of the best natural subjects for LE. The ground and rocks that provide the structure of the waterfall don't move, and therefore remain perfectly clear in a photo that lasts several seconds. But the water movement can become blurred within ½ second and takes on an entirely different view than what your eye sees. The combination of blurred movement and still elements can be a stunning contrast in subjects (as well as contrast in light too).
Tips, Tricks, and Even More Examples
Tips for shooting LE in the field and for post-processing are covered in the Learning Long Exposures Part 2. It includes a bunch of other examples too.


Jeff Smallwood
7/16/13
5:17 PM
http://www.jeffsmallwood.com/index.cfm/blog/view/id/106